

Learning how to make butter with an immersion blender is easy! If you have leftover whipping cream and don’t know what to do with it, using a hand held blender to make homemade butter would be a fun project. In this guide I explain the process step-by-step so you can make delicious butter in minutes. If you’ve ever asked yourself if you can make butter with an immersion blender, keep reading!
Why Make Homemade Butter?
Since butter is available in almost all grocery stores, you might be wondering why anyone would want to make homemade butter. There are actually a number of reasons:
A fun experiment – Whether you’re developing a new recipe or making something from scratch, experimenting with new things in the kitchen to see what happens can be fun.
A nice garnish – This immersion blender butter looked and tasted very similar to the whipped butter served alongside Belgian waffles and buttermilk pancakes at breakfast cafes. If you want to make a breakfast extra special, serve it with some freshly-made butter.
Use up leftover cream – We’ve all been in the situation where we had leftover heavy whipping cream. It’s not used in a lot of recipes, so once you use what you need, the carton usually just sits in the refrigerator. Why let it go to waste?
To make cultured butter – Butter treated with cultures is tangier, creamier, and all around more flavorful. If you can’t find it in the store, you can make it at home.
Make flavored butter – By beating the cream with honey, garlic, cinnamon and other mix-ins, you can create flavored butter that are absolutely delicious.
Cheaper organic butter – Organic butter can be pricey. Some food bloggers have noticed that it can be possible to find organic cream for cheaper than storebought organic butter, so making the butter at home might be a way to save some money.
As you can see, there are a lot of reasons to make butter at home!
Can You Make Butter With An Immersion Blender?
Yes! When you think of homemade butter, the image of someone standing over an antique butter churn probably comes to mind. While your grandma or grandpa may have spent hours cranking the churn to turn cream into butter, you can do the same in just minutes with an immersion blender.
Just like a churn, a modern blender can beat the fat molecules out of heavy cream so that they clump together and form butter. Although full-size blender can definitely do the job, using one would be overkill if you just want to make a small amount of butter.
Similar to when I made whipped cream with an immersion blender, using a small immersion blender to make butter would be the better choice. A hand held blender will churn heavy whipping cream into butter quickly, and since the tool / appliance is small, there’s minimal cleanup. As you can see, a stick blender is the best choice in some cases.
Immersion Blender Butter Ingredients
To make butter with an immersion blender, you only need one ingredient:
Heavy Whipping Cream – After a few minutes of agitation by an immersion blender, the whipping cream will turn into butter. In fact, this homemade butter recipe is one of the few that has fewer ingredients at the beginning than the end.
However, although I didn’t use any other ingredients in my recipe video, you can also add:
Salt (optional) – Just like with any other food, a bit of salt can help to bring out the flavor. However, I almost always use unsalted butter in my kitchen, so I didn’t add any.
Cold Water (for washing) – Although I didn’t do this step, trying to mix in some cold water into your butter when it’s done helps extract all of the buttermilk, not only making the butter firmer but also extending its shelf life.
What Type of Cream Do I Need To Make Butter?
According to VegeHomeCooking.com, cream needs to be at least 35% fat to be turned into butter. Any less, and the cream will never whip into a solid, stiff state. In the United States, dairy products described as “heavy” contain 36-40% fat, so if you want to make butter, look for a product with the word “heavy” in the name, such as “heavy whipping cream” or “heavy cream.”
Whipped cream recipes call for using cream with the same fat percentage, so a good rule of thumb is that if you can turn it into whipped cream, you can turn it into butter, too.
What’s the Difference Between “Heavy Whipping Cream” and “Heavy Cream.”
From the research I’ve done, there should be no difference between “heavy whipping cream” and “heavy cream.” I think the only difference is that some brands add the word “whipping” to the product because they know most people looking for cream with a high fat content want to make homemade whipped cream.
However, in terms of fat percentage–the main factor to look for when making butter–the two products are the same. So, when looking for cream to turn into butter using your immersion blender (or any other appliance), look for a dairy product that has the word “heavy” in the name.

How To Make Butter With An Immersion Blender
Learning how to make butter with an immersion blender is quick and easy. You just have to follow a few steps:
Pour the Cream into a Deep Container
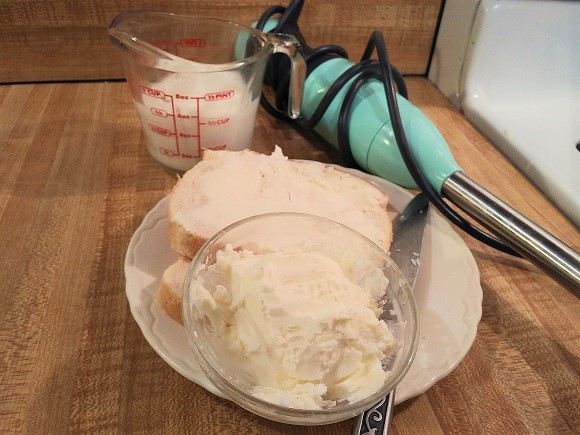
If you’re going to use an immersion blender to make butter, it’s a good idea to pour the cream into a container that is deeper than it is wide. This will give the cream some depth so that the blades can sink into the cream, making it easier to whip. I used the immersion blender cup that came with my unit, so anything similar will be just fine.
I used 1/2 cup of heavy whipping cream. Honestly, I think you could use a cup as well, maybe even up to 2 cups. But any more than that, it might be better to use an electric hand mixer or a stand mixer.
Let the Cream Come to Room Temperature for 30 Minutes
In the video, I used cold heavy whipping cream straight from the refrigerator. However, many other food bloggers recommend letting the cream come to room temperature first so that it separates faster. Although I don’t think that letting the cream come to room temperature is necessary, letting it sit on the counter for 30 minutes would probably be a good idea.
Use the Immersion Blender to Whip the Cream
Once your heavy whipping cream is in the container, simply insert the bottom of your hand blender into the cream and start pulsing. I recommend using a slight rocking motion to make sure the blades can whip all of the cream evenly; otherwise, the cream along the sides of the container might not get whipped.
Pour Off The Buttermilk
The cream will start to stiffen as you whip, going from liquid cream to soft whipped cream, then becoming even more solid. Once you get past the whipped cream stage, you will notice some liquid forming in the bottom of the container.
This liquid is buttermilk, the byproduct of churning cream into butter. Leaving buttermilk in your butter will make it soft and watery, so be sure to pour it off as it forms. You will have to pour off buttermilk more than once, so don’t worry if buttermilk keeps coming out of the butter: it’s totally normal.
Scrape The Blender Clean
As you continue blending the cream, you’ll notice some of the cream / butter sticking to the outside of the blender and the blades. I recommend keeping a knife or fork off to the side so you can keep the blender exterior and blades clean.
Keeping the blades clean will help them whip the butter forcefully, and brushing cream off the sides of the blender will make sure no cream goes unchurned. To make as little mess as possible, you might want to keep a small plate off to the side to lay the knife, fork, and blender so as not to dirty the counter.
Keep Blending Until Stiff
As you continue blending the cream, pouring off the liquid, and cleaning the blades, you’ll notice that the cream will be getting stiffer and less buttermilk will be coming off the butter. Eventually, you’ll have a thick paste which if you continue blending with your hand blender, almost no liquid will come off: that means you now have butter!
Washing Homemade Butter
Why Wash Butter?
As stated previously, washing homemade butter is the process of mixing in cold water when the butter is almost complete to wash out the buttermilk.
When making large batches of butter, other food bloggers but the stiff yet still not 100% completed homemade butter into a large bowl and then run cold water from the kitchen faucet over it while they massage the butter. They then pour off any cloudy liquid that comes out of the butter. When the liquid coming off the butter is clear, they stop.
Washing Immersion Blender Butter
Removing the excess buttermilk will not only make the butter last longer but also make it firmer. Honestly, since this immersion blender butter recipe makes about 6 Tablespoons of butter, I’m not sure if you need to wash it: I’m sure this butter will disappear very quickly.
However, if you do want to wash the butter, pour in cold water once the butter is done. Mix the water in with a spoon or your hands, and then pour off the liquid. Add more water, mix in, and pour off a few more times–until the liquid you pour off is clear. At this point, you’ve removed as much buttermilk as possible, so set the butter aside–it’s done!
Making Butter With An Immersion Blender Timeline
Although it depends on the strength and speed of your immersion blender, this is approximately how long it will take to reach different stages in the butter-making process:
1 Minute – The cream is skiff, probably slightly stiffer than whipped cream. There is no liquid to pour off at this point.
2 – 2.5 Minutes – As the butter starts to form, it will release buttermilk. Be sure to drain it off as it collects.
3 – 4 Minutes – Less buttermilk will be coming off the butter at this point. You’re getting close.
5 Minutes – At this point, there should be almost no liquid coming off the butter. You’re done! If you want to wash it at this point, you can–but I did not.
How Much Butter Does This Recipe Yield?
With 1/2 cup of heavy whipping cream (120g), you should end up with 5.7 Tablespoons of butter (86g). As previously stated, this homemade butter has a bit more moisture than commercially-produced butter, but in general, this recipe yields 5-6 Tablespoons of butter.
What Does Butter Made With An Immersion Blender Taste Like?
In my opinion, this homemade butter tasted fresh and slightly sweet–honestly, I think the best way to describe it would be whipped cream without any sugar. Although it was firm, it wasn’t as firm as storebought butter.
In fact, I think the closest thing to compare it to would be the whipped butter that’s served alongside Belgian waffles or pancakes at breakfast cafes. If you like that butter, you’ll like this homemade version.
How Can I Use Homemade Immersion Blender Butter?
Honestly, I think you could use this hand held blender butter for almost anything. The only thing to keep in mind is that it will have a bit more liquid than commercially-produced butter, so using it in baking might throw off the recipe. I think it would work in an emergency, but it wouldn’t be ideal.
Instead, I think you should use homemade butter on:
Bread / Biscuits – Spreading this soft, slightly sweet butter on toast or biscuits would be awesome. Since the butter is a bit softer than normal, it should be easy to spread.
Cooking – Do you like to sauté vegetables in a combination of oil and butter? This butter would be perfect.
Can I Use Homemade Butter in Baking?
You can–but I wouldn’t recommend it. Like I said, homemade butter has more moisture than storebought butter, so it might throw off recipes such as pound cake or pie crust that call for a certain balance between dry ingredients, fat, and moisture.
How Long Does Immersion Blender Butter Keep?
Without washing and extracting as much buttermilk as possible, this immersion blender butter should keep in the refrigerator for up to a week. However, by washing to remove as much buttermilk as possible, the butter will stay fresh for 2-3 weeks.
Can You Freeze Homemade Butter?
Yes! Frozen homemade butter should keep for up to 9 months.
Can I Use Whipping Cream or Half-And-Half to Make Homemade Butter With An Immersion Blender?
Heavy Whipping Cream / Heavy Cream vs Whipping Cream
Contrary to what you might think, heavy whipping cream / heavy cream (which as explained above are the same) and whipping cream aren’t simply the same product with a different name: the key difference is the word “heavy.”
As stated above, in the United States, cream described as “heavy” has 36-40% fat. However, as explained by a RealSimple.com article, a product labeled as simply “whipping cream” in the United States only has 30-35% fat. Although the 5% difference may not seem like much, it makes a big difference in the texture of the final product.
Whipping cream will become more solid as it’s beaten, but it will never get fully stiff: that’s why the article suggests it’s best used as a simple garnish on desserts rather than as a frosting. Since it’s just under the 35% fat threshold, my guess is that you could make butter from whipping cream, but it would be very soft. It would probably be OK to spread or melt on bread, but not for much else.
Half-And-Half Can’t Be Churned Into Butter
With a milkfat content of between 10.5% and 18%, half-and-half is well below the threshold for forming stiff peaks once beaten. Since 30-35% fat whipping cream is fairly soft when whipped, half-and-half would be even softer. That’s why in a Greatist.com article, writer Nicky Cade says that whipped cream made with half-and-half is watery and deflates quickly: I assume butter made with half-and-half would be the same.
A Chef’s Review
Overall, I was glad that I gave making butter with an immersion blender a try. Aside from being delicious, it was a fun experiment. If you have a bit of heavy whipping cream left over from another recipe, this would be a nice way to use it up so that it doesn’t go to waste.
Although you can definitely make homemade butter in a normal blender or food processor, a hand held blender is best for a small amount of clean since you have better control and less cleanup afterwards. Thus, this immersion blender recipe is ideal if you just need a small amount of butter to serve with Sunday morning waffles, or if you want to experiment with added flavors.
If you’re looking for a new and creative way to use your immersion blender, give this recipe a try!
Possible Changes to the Recipe
Although my immersion blender butter recipe turned out great, possible changes include:
Adding salt – This would help bring out the flavor, as well as extend the shelf life.
Washing the butter – Although not necessary, it would extend the butter’s shelf life, too.
Recipe Variations
Interesting variations to this homemade butter recipes include:
Cultured Butter – Adding a bit of cultured buttermilk or plain yogurt would give the butter a tanginess that would bring out the flavor even more.
Added Flavors – Cinnamon, garlic, and other spices would make the butter very delicious.
Other Immersion Blender Recipes
If you liked this immersion blender butter recipe, take a lot at my other recipes that use the same equipment:
Immersion Blender Whipped Cream Recipe
How to Make Butter With An Immersion Blender Recipe

Ingredients
- 1/2 cup heavy whipping cream (120g)
- *optional: 1/8 teaspoon salt
- *optional: cold water for washing
Instructions
- Although not necessary, it’s a good idea to set the cream out on the counter for 30 minutes so it can come to room temperature. If you do so, it will turn into butter faster.
- Pour the cream into a deep container to make it easy for the immersion blender to blend the cream.
- Once the bottom of the immersion blender is placed into the cream, begin whipping the cream.
- Soon, the cream will begin to stiffen, and liquid (buttermilk) will collect at the bottom of the container. Pour off this liquid and continue whipping.
- Alternate between whipping and pouring off the buttermilk multiple times.
- Use a knife or fork to clean the blades and blender as needed.
- Eventually, continued whipping won’t release any more buttermilk. This is when the butter is done.
- If washing, add some cold water, mix it into the butter with your hands, and then pour it off. Repeat this step until the water you pour off is clear.
- If added salt, add salt now.
- Now that the butter is done, mold it into the desired shape and then freeze.
- *NOTE: This recipe makes just under 6 Tablespoons of butter.
YouTube Video:
Be sure to watch my YouTube video tutorial: